Wednesday, February 29, 2012

Tortellini with Blush Alfredo


I feel like the title makes this sound way more impressive than it actually is. In all honesty, this is not so much a recipe as me sharing with you one of my toss together meals when I need a quick fix.  It is what my sister would call "semi-homemade" (or the food network, whatever). Using my typical kitchen staples, I am able to make a decent pasta dish in about 15 minutes.

 This kind of started out because I never liked jarred Alfredo sauce, yet when I lived with my mother she always seemed to have it in her pantry. My mom has this one pot "wonder" she would make at least once a week with chicken and whatever veggies she had with Alfredo and either a gallon of oil or a pound of butter. I may be exaggerating with the amounts of saturated fat she used, but probably not by much. The food would glisten. I grew to hate this dish, along with a lot of my mothers cooking. Don't get me wrong, I love my mother. She is a wonderful woman who has taught me many things. Cooking healthy is not one of them. I try to encourage her to make some changes in her diet and cooking habits. Old habits are hard to squash; one day I hope she takes to heart what I share with her.

I can be a bit overbearing with the "healthy lifestyle" tips with my family, only because I care and don't want to see them succumbed to cardiovascular disease or any sort of cancer. I have learned alot about what we put into our bodies lately. I would really like to share that with whoever is reading this. Right now is probably not the best time to go on that tangent though, since I am about to share a quick meal that I have probably made more over the course of the years more than I have ever made any other specific meal. Like I said, before my ramblings took ahold of me, this idea originated when I was not fond of the taste of the jarred Alfredo sauce. I added some red spaghetti sauce and found it made pink! There goes my blush sauce. Even better, one night I did not have any red sauce so I dumped a can of diced tomatoes into the Alfredo. I have never looked back.

  • Frozen tortellini or ravioli (any pasta really...whatever is on hand)
  • Jar Alfredo sauce
  • Can diced tomatoes
  • One bag frozen broccoli, green beans, or peas (I like broccoli the best, but again, whatever you have will work. Especially if it is green.)
Prepare the pasta according to the package instructions. Combine the Alfredo, tomatoes, and vegetables in a medium sauce pan and heat. Combine and Voila! YUM

I made this as my Meatless Monday meal this week. I had some leftover chicken from the weekend, which I then shredded up and added to my leftovers for Tuesdays lunch. This is very versatile so use your imagination. This is not a recipe, but a quick meal idea. Take it and run with it. Some nights you just don't have on hand what a recipe calls for and you make do with whatever you have. That is the beauty of cooking!

Thursday, February 16, 2012

Laundry Detergent

This is another catch-up post. I made an original batch of laundry detergent the same night I made my homemade dishwasher detergent. The first batch turned out to be unusable crap. After a day of sitting in my repurposed milk jug, it completely solidified. The blog I found this on warned that might happen and advised to cut down the amount of bar soup to use. Which is what I did and I am so glad I gave this a second chance.

The original recipe makes 2 gallons of detergent. I cut it down to make just one since I wasn't sure how it would turn out. Plus my largest pot is not deep enough to hold two gallons.


  • 1/4 bar of soap (any kind that you would wash your body with)
  • 1/2 cup Borax
  • 1/2 cup washing soda
  • 1 gallon water
Grate the soap using a cheese grater. Cook soap and half a gallon of the water over medium heat, until the soap shreds dissolve. Add the borax and washing soda then bring to a boil. Add half a gallon of cold water. Stir well. Using a funnel, pour your detergent into a one gallon milk jug.

Each load of laundry will use 1/2 cup of detergent. I bought measuring cups and left the half cup one down at my washer. At first I was disappointed by this second batch of detergent because of the texture. The first few loads seemed to have a lumpiness to them. Every time I load my washer, I shake well before poaring. Now it is flowing nice and smooth. Also, this detergent does not create a lot of suds, but that is ok. Suds do not necessarily equal clean. This gallon has lasted me over a month so far and still is not finished.

I will definitely stick to homemade laundry detergent from now on. By making my own detergent, I save some money and help lower my carbon footprint. Every bottle of store bought detergent I use saves the consumption of a plastic bottle that may end up in a landfill.

Wednesday, February 15, 2012

Bacon-Jalapeno Poppers

I'm baaacckkkk! Missed me? I'm sure you did. I missed myself a little.
Well, that sounds a bit weird. I have had a lot on my plate. I attempted to take my last college course to obtain an Associates Degree. Such a tiny little degree and 9 years after high school, I still dont have it! I'm a great student when I can apply myself. A 3.8 GPA doesn't just earn itself, you know. So when I took on this one last class, the blog wound up being the second thing that had to go on the back burner. The first was working out. Exercise has been something newly important to my daily regimen since about Thanksgiving. Even with cutting out the workouts and the blog to make time for school work, I still couldn't get it done. I wound up withdrawing from the class. Such a pity, because that was almost $600 that just blew right out my window. the stress was just too much to handle right now with starting to work full time again and managing my household alone. I have a few recipes piling up that need to be shared. I am going to work on this as well as try to motivate myself to get back into the habit of working out. A happy and healthy mommy can make all the difference in the world to a 4 year old. And THAT, my friends, is the most important. Ever.


Can you guess where I found this recipe? Nothing better than Pinterest! Except of course that one time that the link I followed put a virus on my work computer. DO NOT  click on anything that says 20 worst baby names. The original recipe I used is here. For the first time, in probably ever, I followed this recipe exactly. No substitutions or alterations. It probably helped a lot that there is only 3 ingredients. Easy peasy.

  • 12 jalapenos
  • 1 block cream cheese
  • 8 slices raw bacon, cut into thirds
***you will need a baking sheet and a cooling rack that you would use when cooling fresh baked cookies

Preheat oven to 375. Slice the jalapenos in half and remove seeds with a spoon. Please wear gloves or wash your hand immediately after handling these peppers. You DO NOT want the accidental burning body part incident I wound up with the first time I made these. I will leave it at that, but feel free to use your imagination. Using a spoon, fill each jalapeno shell with cream cheese. If you let the cheese sit out while you are slicing and seeding the peppers, it should become softer and easier to work with. Wrap the bacon pieces around the stuffed peppers and lay it on the cooling rack. Place the cooling rack on a cookie sheet and bake for 20-25 minutes. Recipe yields 24 poppers.

You may want to have your cookie sheet covered with foil before you put the rack on and bake. The purpose of baking them on the rack and not directly on the cookie sheet is so the bacon grease can drip down off the peppers. I am not sure if this collection of grease would make the peppers soggy if you cook them without the rack.

These peppers were an absolute hit. I first made them for a super bowl party and they were the first thing devored from the entire spread. I had about 5 myself. Every time someone walked by the table, they could not resist popping one of these boys in their mouths.  I have made them again for a special Valentines treat and will be making them again for my brother-in-laws birthday dinner this upcoming Saturday. They are a bit tedious to make, but definitely worth it.

Some poppers were a lot spicier than others. I'm not sure why this happened. Maybe I missed a seed or two when cleaning them out. Maybe some of the oil was more concentrated in some of the peppers. I have no idea. Some did not seem to be spicy at all, which would make me think these are kid friendly, until you bit into that one that blows your taste buds out of your mouth...

Eat at your own risk. But they are sooooo worth the risk!

Monday, January 23, 2012

Chicken and Rice Soup


This soup is one that my green thumb is especially proud of. I made a chicken dinner for my sister's family last Sunday and managed to really stretch that bird far! I made the chicken in the crock pot with some onions and carrots. We had a nice healthy meal together and I was left with a decent amount of chicken leftovers as well as a carcass to make broth.

Those bones with scraps of meat stuck to it is definitely something that would be trashed in most households. I really do not understand why though. Maybe I've convinced myself that going green is the way to go (it surely is!). When I tell people how I save my scraps of veggies in the freezer or my unwillingness to trash a bird carcass, they look at me like I have 3 heads. "What is wrong with this chick?" they must be wondering. "Why would she go through so much trouble when there are perfectly good packaged broths at the supermarket." Now, I don't judge, but I do wonder what makes these people try to argue or brush off my choices as an invalid way of life. While I do not bring it to their attention, I often wonder how a person can complain about lack of money or how unhappy they are with their body weight, when they are unwilling to take some small steps to fix the problem. My choices that get scoffed are actually made with a lot of thought behind them. I know the lifestyle that I try to live is a bit unconventional to modern day society. How dare I spend an extra 20 minutes making broth instead of running to the food store? That is just too much work! I often wonder why some people cannot see how far the benefits of a little extra work can stretch.

By making my own broth:
  1. I am able to make use of every penny that I already spent. Meat and fresh vegetables are usually the most expensive items at the market, but are the most beneficial compared to packaged items. As a single mother, my dollars need to stretch as far as they can go. I cannot, in good conscious, throw out something that can be used again. 100% of my broths are created with leftovers and  veggie scraps from previous meals that would have normally been tossed down the garbage disposal. Chicken and vegetable broth is basically free to me!
  2. I reduce the amount of preservatives and sodium. Even the low sodium choices still contain sodium and preservatives. If it cannot go bad, it is no good. Think of how long that broth had to sit on a shelf and then realize what had to be put into it to make that possible. When you use those packaged "goods", you are then putting all that stay fresh crap into your system. Who knows how long it will sit in your body and all the possible ways it could alter your natural chemical balance. Honestly, I do not swear off packaged goods completely, but I do my best to keep it to a minimum.
  3. I help save the planet. We have all heard the statement, "Reduce, reuse, recycle". We know what each word means, but most people don't know that to be most effective in reducing your carbon footprint, this statement should be followed in order. First, you should reduce the amount of packaging you use. By reducing your intake of packaging materials, less gets sent to landfills or needs to be recycled. While recycling is great, it requires energy and fuel to do. By not purchasing store bought broth and storing my own in reusable containers (reuse glass jars of packaged products you have already purchased), I minimize the amount of waste produced in my home. 
Wow, this blog post is going to be longer than I had expected. I am really not a writer, but once I get started on a subject, sometimes I cannot stop. So basically, I used my carcass to make homemade broth. Monday morning before work I put the chicken carcass, the chicken neck, and some veggie scraps from my frozen broth bag into the crock pot. I then added two bay leaves and filled it with cold water. I read somewhere that cold water helps to better extract the vitamins before cooking them. While I have no idea if this claim is true, it doesn't hurt to start with cold water, so why not? I set my crock pot on low and went to work. Coming home to the aroma of brewing broth is fabulous! When I came home, I sifted all the bones and veggies out of the broth and then refrigerated it overnight. Once it has been cooled, you can scoop off the fat that settles on top and you have a nice healthy broth.

Usually I store my homemade broth in 2 cup portions and freeze them for later use. Since I had so much leftover chicken, I decided to make soup. We have had a pretty mild winter so far, but I think we are finally getting into the cold cold weather. What is better than some homemade chicken soup when you just cannot seem to get warm?

The night before,  I cooked up some brown rice to have with dinner and saved the leftovers to use with the soup.  This chicken soup is another crock pot meal that cooked while I worked, so I prepped everything in the night before. I diced up some carrots and celery, added a bag of frozen corn, shredded my leftover chicken, and then added some of the leftover onions from the original chicken dinner. All these items got tossed in the crock pot with 2 bay leaves and then refrigerated. Come morning, all I had to do was add broth, stir, and set to low. The rice was added once I got home from work. I don't have exact measurements for this soup, but with soup, you don't need them. Just add ingredients until you think it looks good. I think I used 3 stalks of celery, 5 carrots, a bag of corn, and approximately 12 cups of broth. Just make sure if you are adding rice into the soup towards the end of the cooking process, use more broth than seems necessary.

This soup was wonderful to have on hand this week, since we wound up with our first snow of the season. It did need a little salt and pepper. I don't like to add too much salt while cooking, figuring it can always be added at the end if needed. Sophia did really good eating this soup! She has never liked celery, but she loved it in the soup. She assumed the green things were peppers and ate all of them first. I did not inform her that they were in fact celery until they were all gone from her dish. She was amazed that she just ate something that she did not like! This is why I always put food on her plate and require her to try at least one bite every time we eat. Her tastes change daily, so sometimes figuring out what she will like is impossible. One thing she ALWAYS likes is bread. Good thing I made the choice to outlaw white bread in my home. Her favorite thing to do when we have soup is to dip a piece of bread into the broth. For some reason, she will eat her crust this way but not when it is a sandwich. Children are funny little people! Keeping up with her quirks is next to impossible, but always fun.

Tuesday, January 17, 2012

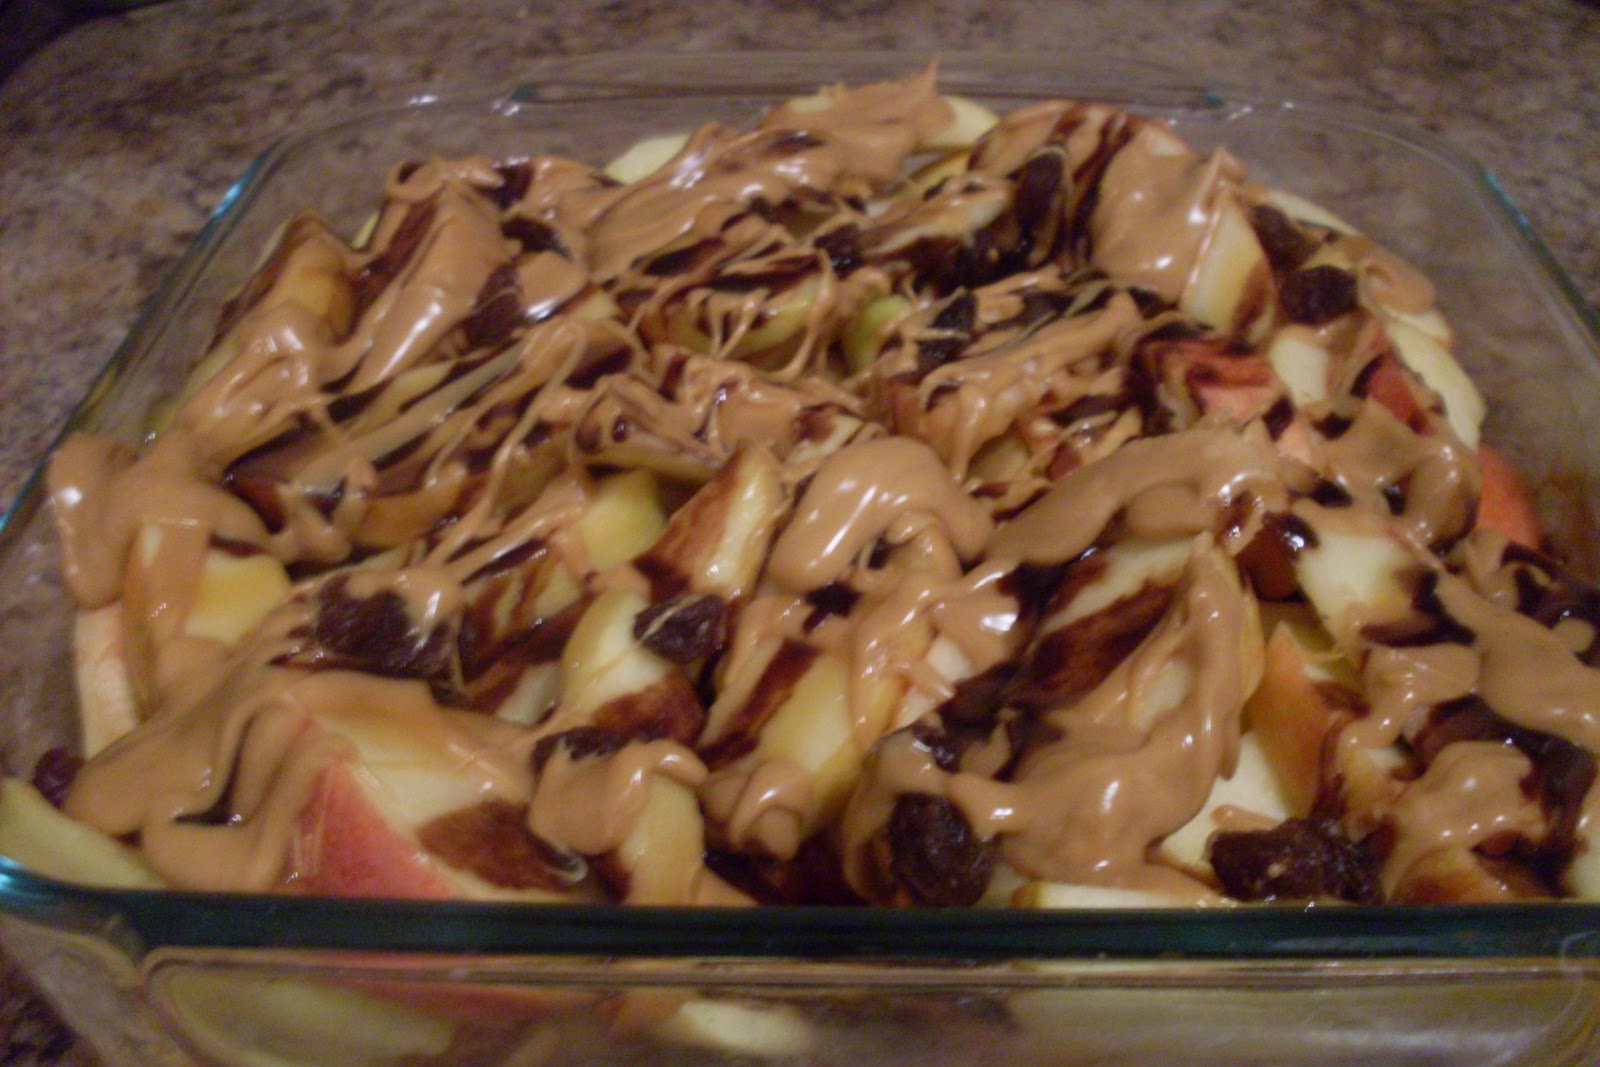
Apple Nachos


Never guess where I found this recipe?? Pinterest strikes again! I am seriously addicted to this website, but for a good cause. I have been getting most of my new recipes I want to try from there, plus some sweet craft and DIY ideas as well. Anything I do, even if it is not cooking, I plan to share on here. I'm a well rounded domesticated single mommy!

One tip before we get into the apples: Whenever you use a jar of salsa, pickles, spaghetti sauce, or anything that comes in a similar glass jar - wash and save the jar. Whenever you use a can of pineapples, save the juice in your saved glass jar and refrigerate. You could even save the can from the pineapples to bake miniature cakes or breads in and literally have no waste from the whole ordeal! Being green excites me! The pineapple juice can be used for many different applications. You can add it to rice to give it a sweet flavor and pair that with ham or teriyaki chicken, for instance. Today I used mine to slow down the browning process for my sliced apples. I have read some people like to use 7-up or lemon juice to do this. Lemon juice could work, but I am opposed to using 7-up. Who wants to use unhealthy soda on their crisp healthy fruit? Surely not me! I am already knocking the health food points down by using caramel and chocolate, so there is just no room in this mix for soda!

  • apples, the amount will vary according to how large of a dish you are using and how many people you are feeding.
  • melted peanut butter
  • chocolate syrup
  • caramel sauce
  • raisins, a small snack box should do
  • pineapple or lemon juice
Slice up your apples, leaving the skin on. Using a paper towel or paintbrush, lightly coat your apples with either pineapple or lemon juice. Coat completely but do not drench. You do not want soggy apples! Drizzle your peanut butter, chocolate, and caramel generously over the apples, then top with some raisins.

You have complete freedom with this recipe. Get creative! Alternate chocolate chips for syrup. Top apples with honey and almonds. Maybe do s'mores apples with chocolate syrup and marshmallow. You can do anything your heart desires. Some of the toppings might not be the healthiest, but putting them on top of apples instead of ice cream, cake, or pie is way better for you.

These were made for a ladies poker night and everyone raved over them. I will be doing another batch for Friday. It is my mothers birthday and she specially requested them. The only problem with this dish is it cannot be made ahead of time. Id say your window of not brown apples is about 3 hours. So if you are making them for a function, start slicing up your apples about 20 minutes before you plan to head out the door.

Thursday, January 12, 2012

Santa Fe Rolls with Avacado Dipping Sauce

Here we go, slacker here! I am posting my Meatless Monday meal on Thursday. Ugh, I'm so bad! I have been so excited to share this recipe too! The original recipe that I based it on was found through Pinterest (surprise, surprise), here. I find so many recipes on Pinterest. If you are not already a member of that site, you need to be! Especially if you have any interest in being a Suzie-homemaker. It is filled with so many ideas for recipes, crafts, home interior, fashion...you name it, its on there! Warning: browsing and pinning can be quite addictive. It is an invite only website, so if you would like to join, comment with your email address and I will invite you!

As I create my Pinterest recipes, I need to remove them from my Yummy board, so I am able to find the ones I still need to make more easily. Each recipe that I post on this blog have been getting pinned, as well as some of my older ones. I am hoping to create more traffic to my blog and get some new readers. I welcome anyone reading this or any other posts to leave comments regarding your ideas, opinions, or experiences. Comments are great! I do not get nearly enough comments!


As with most of the recipes I try, I modified the original recipe. This really wasn't the plan, but as I went along gathering my ingredients, it just kind of happened that way. First, I had some mozzarella on hand so why would I go buy a different kind of cheese. Second, I didn't see any green onions in the store so I substituted for a regular sweet onion. Third, I completely forgot to buy spinach and as I was assembling the rolls at 9pm Sunday night, there was no way I was running out to get some. Make do with what you have!

For the egg rolls:
2 cups frozen corn, thawed
1-15 oz can black beans, rinsed and drained
2 cups shredded mozzarella cheese
2/3 onion, diced
1 tsp ground cumin
1/2 tsp chili powder
1 tsp salt
1/4 tsp cayenne pepper
1 package of egg roll or wonton wrappers

Preheat oven to 425F. Line 2 baking sheets with aluminum foil and spray lightly with cooking spray.
In a large bowl mix together corn, beans, cheese, onions, cumin, chili powder, salt and cayenne pepper. Using a small spoon, scoop a small amount of filling onto the wrapper. Starting at a corner, carefully start to roll the wrapper. When it’s slightly rolled, tuck in the two side and continue rolling to the last point. Lay on baking sheet with the open flap portion of the roll on the bottom. Repeat with remaining wrappers and filling, placing them slightly apart on the baking sheet.
Lightly spray the tops of the egg rolls with cooking spray and bake for 15 minutes.

For avocado ranch:
3/8 cup mayonnaise
3/8 cup sour cream
3 Tbs milk with a dash of lemon juice (substitute for 3 Tbsp buttermilk, let sit 5 minutes before using)
1/2 Tbs olive oil
1/2 Tbs lemon juice
1/3 onion
1/4 tsp salt
1 avocado, peeled and pitted
Place all ingredients in a blender and pulse until smooth. Use immediately

As I have never made anything like this, I was so nervous as to how it would turn out. Let me tell you! After my first bite, I actually said OUT LOUD, "WOW, I made this?" The amount of onion in the filling mixture was a bit nerve racking when mixing it. I thought they would wind up being too oniony, especially since I did not saute them before putting them in the filling. Not at all! They do not taste too oniony, but DO NOT let that fool you! These babies will give you some kickin' breath. Have some gum for dessert! You will need it.
I brought some of these rolls to work for lunch on Tuesday. As a leftover, they were still pretty tasty, but lost some of the appeal. The roll no longer had that satisfying crunch once it was microwaved. I would suggest reheating these in an oven or toaster oven to try to keep the crunch. OR, only bake as many as you will eat in one sitting and freeze the rest. The original recipe states the uncooked rolls will freeze well, though I have not tried this myself yet.

The avocado dipping sauce was just as fabulous as the rolls. It tastes so light and airy. This was the first time I have ever cooked with avocado. I actually had to google how to cut one. Not as hard as it looks.

Sophia did so good with these rolls! She ate her entire dinner! I had some leftover brown rice, so I lightly sauteed some diced tomato and green peppers with a little garlic powder and mixed that into the rice. I will definitely be making these rolls again. They also got me interested in experimenting with some new types of rolls. I will be doing some variations off of this recipe and then maybe some completely new ones. Pinterest is definitely full of enough ideas to keep me busy!