Showing posts with label Chicken. Show all posts

Sunday, January 6, 2013

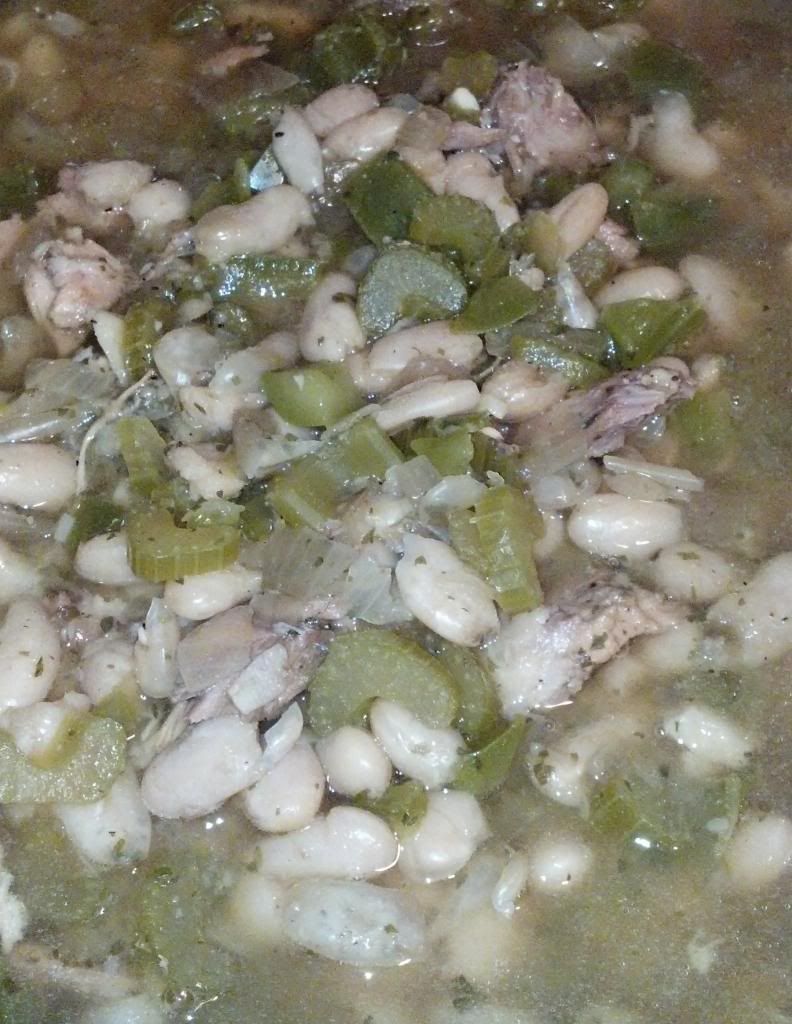
"Monday" Beans and Chicken


This is a recipe that I sat on for a while. I have no idea where I found it, but I really liked the story, so I copied it into my recipe notebook. Then I promptly forgot all about it. So months later....

While I was doing last week's meal plan, I knew I was going to use the local, free range, and organic chicken thighs that I received from my Greensgrow Farm winter CSA. Since this meat was such amazing quality, I had to make sure I used it to its full advantage. Normally I would make stock from chicken bones, but the story of Monday beans and chicken randomly popped into my head. I love when great food ideas strike! Only problem: I could not seem to remember where I found the recipe. I googled it for days to no avail. I could find the story, but no recipe. Finally I remembered that I had written it down in my book. I would seriously lose my head if it...actually, I think sometimes I do.

The name of this recipe derives from an old Southern tradition. On Sunday nights, families would sit down together for a nice dinner of either or ham. Any leftovers, including bones, were thrown into a pot of beans on Monday. This pot would slowly cook on the stove through the day, while the women would spend the day doing laundry. Sometimes this dish is called Laundry Day or Wash Day Beans.

Obviously, I cannot enjoy "Monday" beans and chicken on a Meatless Monday, but I do like it's logic. I think this is a great idea for Sunday dinner. I prepared a quick and easy dinner of roasted chicken thighs on Saturday night and then let this dish cook in the Crock Pot, while I attempted to get a handle on the remaining Christmas mess. Thankfully the dinner was much more successful than my attempts at being productive.

  • 1lb beans, whichever type you chose - soaked overnight
  • 1lb leftover (cooked) chicken or ham with the bones if you still have them
  • 1 bell pepper, chopped
  • 1 onion, chopped
  • 3 celery stalks, chopped
  • 2 Tbsp Parsley
  • 1 Tbsp ground black pepper
  • pinch cayenne pepper
  • 2 cups water
  • 1 Qt Broth
  • 2 bay leaves
Place all ingredients in Crock Pot. Be sure broth and water covers meat and beans. Add more water, if needed. Cook on high for an hour, then set to low and continue to cook for 7 hours. Remove bones and bay leaves. Serve as soup or over rice.

As always, I went a little off recipe. That always seems to happen, according to what I have on hand. Better to use what you have than let it go to waste, just because you went and bought something else. I used a little over half a pound of white beans and I couldn't tell you the exact weight of the meat that was used. It wound up being the meat off two thighs and four thigh bones. Surprisingly, that gave me a decent amount of meat in my final product. This recipe really does lend itself to variety, since you can switch up your beans and types of meat. I will be definitely be trying many different variations in the future. I would recommend only using the larger bones if you are using a chicken, so you can pull them out easily.

Either because I went off recipe with my amount of beans or because this is a southern meal, but this meal is hot! It was way too spicy to even attempt to feed to Sophia. Luckily, I had some odds and ends of leftovers that she could eat for dinner. While it was super spicy, it was not too overpowering for me. So if you don't like it hot, try and cut down on the amount of pepper OR be sure to have a large glass of water and a piece of bread to go alongside your meal.

Wednesday, June 6, 2012

One Pot Wonder


Talk about a quick easy dinner. I used one of my mother's favorite techniques of throwing random food and chicken in a pot and letting it cook. Unfortunately my mother and I do not see eye to eye on food preparation, so instead of her usual butter, Alfredo (or cream of chicken soup), chicken, and veggie concoction; I created a healthier one pot wonder. Having no idea what to do for dinner yesterday morning, I pulled out some chicken to thaw and contemplated the meal while I was working. Again, with the American mindset of meat = dinner. Bad habits are hard to break! As much as I like to stay away from processed foods, I do have some of those Lipton flavored rice packets in my cabinet. I very rarely use them, but they are a quick fix when I am all out of meal ideas. My dinner was in peril of becoming a processed flavored rice mix, baked chicken, and steamed veggies. How boring!!

After work, I went to the gym and worked my butt off. I really needed that post vacation workout to get my body back on track after the vacation food bender. At least we did a lot of walking while we were away. After 45 minutes of intensive cardio, there was no way my body wanted that salty, processed, and dehydrated crap. Luckily I had some fresh veggies on hand, because a brilliant idea hit!

You could prepare this recipe with any assortment of veggies you have on hand. All you need to know is their cooking times to make sure you dont over-do one type while not completely cooking another. The recipe I am providing is simply what I used. Use more or less of whatever you want. You can even change it up completely.

  • 1 bunch kale, ribs removed and leaves torn into bite sized pieces
  • 2 potatoes, sliced
  • 2 onions, chopped
  • 2 chicken breast, diced
  • 2 cups veggie broth
  • 8 mushrooms, quartered
  • Just a dash of garlic powder
Put all ingredients, except mushrooms, in a large pot.Cover and simmer on medium-low heat for 15 minutes. Add mushrooms. Cover and simmer for another 5-10 minutes. Make sure the chicken pieces are fully cooked. Add garlic powder and serve.

At first this meal was a little bland for my taste buds, so I added a dash of ground pepper. After a bite or two, I really did enjoy this quick and easy meal. As an added bonus, I felt very full after just one bowl. I didn't have to eat a lot to be satisfied. Must have been the kale! I didn't put too much kale in Sophia's bowl. It does have a strong and unusual flavor, so it is one I am slowly introducing to her. Her bowl was filled with chicken, onions, mushrooms (which she instantly picked out), and potatoes. My child may be the only one in existence that does not like french fries, but she sure does like cooked onion. Which brings me to a thought....

Many people consider me strict when it comes to meal times. I'll admit that I am. I have my reasons though. A friend of mine complained just last night that she has to get up from her meal multiple times at dinner to retrieve something for her indecisive child. I would never judge a mother on how she runs her household, but that is something I just couldn't do. A lot of times, sitting down to a meal is the only break in the day I get. Heck, sometimes it is not even a break, since I work through a lot of my lunches. I make sure Sophia has everything she needs to enjoy her dinner (sometimes I forget the ketchup, but she can reach that herself if she wants it). What I serve is what's for dinner. Very occasionally, when I try a new exotic or spicy recipe, I will make her something else - but only after she tries at least 3 bites. A child will usually eat what is provided for them, especially when they know it is the only option. I believe that my child is not a very picky eater is directly correlated with not giving her the option. If she wants to eat, she eats what she is given. No snacks if she doesn't eat enough and definitely no snacks immediately after dinner when she does not finish her plate. My child eats and enjoys just about every vegetable that I serve. Some days she may not like something, but I continue to serve it to her. On more than one occasion, she liked it a second or a third tasting. I also do not tell her the name for some of the more questionable veggies on her plate. Instead of letting her brain decide what she likes, it forces her taste buds to decide. That has been my best method in getting her to like something she previously was not a fan of. My way may not work for everyone, but I think it is a good way to be. Believe me, it would be much easier to pop in some microwavable (processed) chicken nuggets each night instead of listening to her whining and compromising on how much she is supposed to eat. Sometimes the better choice is not always the easiest...

I must say, it was really nice not having to slave over the stove for dinner. I was able to get some other things done around the house while dinner was cooking. As a single mom, I don't always have that luxury!

Monday, January 23, 2012

Chicken and Rice Soup


This soup is one that my green thumb is especially proud of. I made a chicken dinner for my sister's family last Sunday and managed to really stretch that bird far! I made the chicken in the crock pot with some onions and carrots. We had a nice healthy meal together and I was left with a decent amount of chicken leftovers as well as a carcass to make broth.

Those bones with scraps of meat stuck to it is definitely something that would be trashed in most households. I really do not understand why though. Maybe I've convinced myself that going green is the way to go (it surely is!). When I tell people how I save my scraps of veggies in the freezer or my unwillingness to trash a bird carcass, they look at me like I have 3 heads. "What is wrong with this chick?" they must be wondering. "Why would she go through so much trouble when there are perfectly good packaged broths at the supermarket." Now, I don't judge, but I do wonder what makes these people try to argue or brush off my choices as an invalid way of life. While I do not bring it to their attention, I often wonder how a person can complain about lack of money or how unhappy they are with their body weight, when they are unwilling to take some small steps to fix the problem. My choices that get scoffed are actually made with a lot of thought behind them. I know the lifestyle that I try to live is a bit unconventional to modern day society. How dare I spend an extra 20 minutes making broth instead of running to the food store? That is just too much work! I often wonder why some people cannot see how far the benefits of a little extra work can stretch.

By making my own broth:
  1. I am able to make use of every penny that I already spent. Meat and fresh vegetables are usually the most expensive items at the market, but are the most beneficial compared to packaged items. As a single mother, my dollars need to stretch as far as they can go. I cannot, in good conscious, throw out something that can be used again. 100% of my broths are created with leftovers and  veggie scraps from previous meals that would have normally been tossed down the garbage disposal. Chicken and vegetable broth is basically free to me!
  2. I reduce the amount of preservatives and sodium. Even the low sodium choices still contain sodium and preservatives. If it cannot go bad, it is no good. Think of how long that broth had to sit on a shelf and then realize what had to be put into it to make that possible. When you use those packaged "goods", you are then putting all that stay fresh crap into your system. Who knows how long it will sit in your body and all the possible ways it could alter your natural chemical balance. Honestly, I do not swear off packaged goods completely, but I do my best to keep it to a minimum.
  3. I help save the planet. We have all heard the statement, "Reduce, reuse, recycle". We know what each word means, but most people don't know that to be most effective in reducing your carbon footprint, this statement should be followed in order. First, you should reduce the amount of packaging you use. By reducing your intake of packaging materials, less gets sent to landfills or needs to be recycled. While recycling is great, it requires energy and fuel to do. By not purchasing store bought broth and storing my own in reusable containers (reuse glass jars of packaged products you have already purchased), I minimize the amount of waste produced in my home. 
Wow, this blog post is going to be longer than I had expected. I am really not a writer, but once I get started on a subject, sometimes I cannot stop. So basically, I used my carcass to make homemade broth. Monday morning before work I put the chicken carcass, the chicken neck, and some veggie scraps from my frozen broth bag into the crock pot. I then added two bay leaves and filled it with cold water. I read somewhere that cold water helps to better extract the vitamins before cooking them. While I have no idea if this claim is true, it doesn't hurt to start with cold water, so why not? I set my crock pot on low and went to work. Coming home to the aroma of brewing broth is fabulous! When I came home, I sifted all the bones and veggies out of the broth and then refrigerated it overnight. Once it has been cooled, you can scoop off the fat that settles on top and you have a nice healthy broth.

Usually I store my homemade broth in 2 cup portions and freeze them for later use. Since I had so much leftover chicken, I decided to make soup. We have had a pretty mild winter so far, but I think we are finally getting into the cold cold weather. What is better than some homemade chicken soup when you just cannot seem to get warm?

The night before,  I cooked up some brown rice to have with dinner and saved the leftovers to use with the soup.  This chicken soup is another crock pot meal that cooked while I worked, so I prepped everything in the night before. I diced up some carrots and celery, added a bag of frozen corn, shredded my leftover chicken, and then added some of the leftover onions from the original chicken dinner. All these items got tossed in the crock pot with 2 bay leaves and then refrigerated. Come morning, all I had to do was add broth, stir, and set to low. The rice was added once I got home from work. I don't have exact measurements for this soup, but with soup, you don't need them. Just add ingredients until you think it looks good. I think I used 3 stalks of celery, 5 carrots, a bag of corn, and approximately 12 cups of broth. Just make sure if you are adding rice into the soup towards the end of the cooking process, use more broth than seems necessary.

This soup was wonderful to have on hand this week, since we wound up with our first snow of the season. It did need a little salt and pepper. I don't like to add too much salt while cooking, figuring it can always be added at the end if needed. Sophia did really good eating this soup! She has never liked celery, but she loved it in the soup. She assumed the green things were peppers and ate all of them first. I did not inform her that they were in fact celery until they were all gone from her dish. She was amazed that she just ate something that she did not like! This is why I always put food on her plate and require her to try at least one bite every time we eat. Her tastes change daily, so sometimes figuring out what she will like is impossible. One thing she ALWAYS likes is bread. Good thing I made the choice to outlaw white bread in my home. Her favorite thing to do when we have soup is to dip a piece of bread into the broth. For some reason, she will eat her crust this way but not when it is a sandwich. Children are funny little people! Keeping up with her quirks is next to impossible, but always fun.

Sunday, January 8, 2012

Chicken in a White Wine Reduction Sauce


Let me start off by saying, the recipe I found for this sauce must have been posted online as some sort or joke! I doubled the recipe and I still wound up with only 1/4 cup of sauce! The fact that someone actually posted a recipe yielding such little results amazes me. Usually I have to split a recipe in half so we don't waste the leftovers. This was just ridiculous. I am going to post the doubled recipe I made, but remember that it still makes very little sauce. If you have to feed more than two people, you will have to double or even triple this recipe.

  • Chicken breasts
  • 2 ounces white wine (use a shot glass to measure)
  • 1 cup chicken or vegetable stock
  • 1Tbsp olive oil
  • 1 Tbsp butter*
  • 1 tsp lemon juice*
  • 1 clove minced garlic*
*optional, used for flavoring

Heat olive oil at a very high heat. Sear chicken for 3 minutes per side. Depending on thickness of chicken, finish cooking by baking at 350. Using same pan the chicken was seared in, add garlic* and cook on medium heat until fragrant. Add wine, stock, and lemon juice* and continue to cook on medium heat until reduced. A spatula will create a clean trail when dragged across the bottom of the pan when the sauce is finished. Whisk in a tbsp of butter* then serve over chicken.

The butter, lemon juice, and garlic are all optional. I only used garlic and the sauce came out amazing. The small amount was actually plenty for my little chicken breasts that I cooked, but I would recommend making a larger batch if feeding more than two people. Since the "reduction" part of the sauce is made by evaporation of liquids, a larger amount will stretch out the cooking time.

I served this with some mixed string beans and brown rice that I cooked in chicken broth. This made for a very satisfying and healthy meal.

Thursday, November 17, 2011

Chicken Pot Pie Casserole


Filling:
  • 1 bag mixed veggies
  • 2 cups cubed chicken, cooked
  • 1 can condensed cream of chicken soup
  • 1 cup milk
  • 1/4 cup pancake mix
  • 1/4 tsp ground black pepper
Crust:
  • 1 cup pancake mix
  • 1 cup water
  • 1 Tbsp parsley
  • 1/2 tsp dried rosemary or basil
To make the filling: Whisk together soup, milk, pancake mix, and ground pepper. Combine with chicken and veggies in a skillet and cook over medium heat for 4-5 minutes, stirring occasionally. Pour into a 2 quart casserole dish.
To make the crust: Whisk together pancake mix, water, parsley, and rosemary or basil. Slowly pour an even layer over the chicken mixture.
Bake 30-35 minutes. Cool for 5 minutes before serving.

This was another recipe I found on food packaging. This recipe came off the side of a box of pancake mix. Chicken pot pie is a great comfort food, so I was super excited to make this. The prep work is really not all that hard and most of the cooking time is baking (hands-off!). Not sure if you have caught on yet, but I tend to change some aspects of most of my recipes. The original recipe called for a mixed bag of cauliflower, broccoli, and carrots. Great mix of veggies, but I felt the pieces would be too big for my idea of a pot pie. I have always had pot pie with smaller, more bite sized vegetables, so I figured a bag of frozen mixed veggies would work.

As promised, I will share with you my mini disaster. I decided to take a nap before I made dinner. I am so luckily to have a child who will allow this (for the most part). I am a very heavy sleeper, so when I wake up I am usually in a fog, for a bit. I glanced over the recipe last night to make sure I had all my ingredients on hand to make the pot pie. So as soon as I got up from my nap, I started cutting my chicken and combining my filling ingredients. Only when the filling ingredients were all together did I notice the chicken was supposed to be pre-cooked! I am hoping if I didn't catch this huge blunder, it would have cooked in the oven while it was baking. Maybe? Not really sure, though raw chicken is one monster I do not like to mess around with. Easily fixed (semi)-disaster. I scooped out the chicken from the mixture and plopped it in another pan to cook it up real fast. After that was finished, it was pretty much smooth sailing.

This was a pretty good meal. The crust was not one that I would imagine a pot pie to have. Texturally, I would have preferred a more flaky crust. The herbs used made it delicious, I opted to go with basil.

I probably wouldn't jump to make this again right away, but I think it could be a great idea to use leftover chicken and vegetables. It seems to be a pretty easy recipe to cut in half. Also, I think you could run with it as a guideline for some other variations. I thought maybe using cream of mushroom soup with beef cubes and chopped up pepper, onions, and carrots? Or switching out for cream of cheddar soup for a bit of a different taste with the chicken. Get creative. Let your mind wander. Experiment. You won't know if you like it, until you try!

Thursday, November 10, 2011

Chicken Broth


The chicken carcass from Sunday was finally put to good use. I made chicken broth in my crock pot. I cannot see why anyone would ever go buy canned broth from the store. It took very little prep work, mostly using things I already had saved, and cooked while I slept. The only inconvenience was that I had to get up a little earlier than normal to drain the chicken and veggies from the broth. If you set it up before work, it would be finished when you come home.

I loaded up my crock pot to almost the top with the carcass, some leftover chicken, carrots, apple cores, celery (scraps and stalks), pepper cores, onion skins, potatoes, greens from leeks, radishes, some garlic cloves, and about 2 Tbsp red wine vinegar. Basically anything natural and healthy that you need to put to use. I even poured in a cup of vegetable broth I had thawed from when I made the braised mushrooms.  I also sprinkled in some Italian seasoning and added 3 bay leaves. Next time I probably won,t do the seasonings, just because they were really hard to skim out. I read that vinegar helped to pull minerals and nutrients out of the chicken bones and veggies. Most recipes recommended apple cider vinegar, but any type can work. You can add salt if you like. I figure most recipes I will use the chicken broth in will be loaded with other flavors, so I decided it was not needed. I covered the ingredients with cold water and let it sit for an hour. This allows the vinegar to seep in and do its magic. If you don't have an hour to spare, then it is not a big deal. Set the crock pot to low and let it cook. My broth cooked for about 12 hours. You can cook it on low anywhere from 8 to 18 hours.

Once you have enjoyed not slaving over the stove and your broth is done brewing, you will have to separate the broth from the veggies. When filled to the top, my crock pot is way too heavy for me to pour directly into the strainer. First I used a large spoon with holes in it to pull most of the large veggie pieces out. The I put a fine holed colander over a large pot and poured the broth through it. I sent the broth through the colander a few times to pull out most of the bits and pieces. Like I said, I was unable to get all of the Italian seasoning bits out. That's OK though, it will just add more flavor to whatever I cook with it.

My next step will be deciding what I want to cook using my first batch of homemade chicken broth.

Sunday, November 6, 2011

Crock Pot Whole Chicken


I enjoy making a nice homemade dinner on Sundays. I like having homemade food most days actually, but Sunday is a great opportunity to make a meal that will last through the week as leftovers. Today was my nephew and godson's 5th birthday, so I was out of the house most of the day celebrating with my family. Quality family time is very important and cooking should never become a chore that impedes on that. By setting my food in the crock pot right before I went to the birthday party, I was able to have my whole chicken cooking for me while enjoying time out of the house.

When cooking a whole chicken, never forget to remove the pieces from the chicken cavity. I discarded these pieces, but now I regret it. I think I should have saved them to help make chicken broth later this week. Once I removed the neck (and whatever else was stuffed in there), I rinsed out the cavity and shoved an orange up there. I rolled the orange to release the juices, cut it in half, then stuffed it in the chicken. I put a layer of veggies at the bottom of the crock pot. I used one onion, some baby carrots, and one green pepper. Now the scraps from the onion and the core of the green pepper was added to my bag of frozen veggie scraps to use for broth.

I sat the chicken on top of the layer of veggies, then I sprinkled some seasonings over top. I used salt, pepper, rosemary, and Italian seasonings. I set the crock pot on low and went on my merry way to my nephew's party. I let this chicken cook for about 6 hours. To test if the chicken is done, stab it with a knife in the thigh area. If the juices run clear, it is done!

This was so simple and will provide at least two meals plus I will make some chicken broth. After pulling most of the chicken from the bones and saving it for another meal later in the week, I put the carcass in a Ziploc bag. This will be used later this week, along with some veggies from my frozen scrap bag, to make chicken broth.

I served this chicken tonight with the veggies it cooked with, my homemade applesauce, and green beans with tomatoes (recipe to follow soon).

Thursday, November 3, 2011

Souped Up Chicken


So, I had leftover Curried Apple-Potato soup from Monday. It had a decent taste, but I just wasn't into it. I never want to waste, so I decided to use it as something other than soup. I marinated tonight's chicken in the leftover soup overnight. Actually, I plopped the frozen chicken in the soup and let it thaw out there. This morning I separated the chicken so it would evenly marinate. I do this a lot when I want to marinate chicken that is frozen. Instead of waiting for it to thaw, adding marinade, and then waiting for the marinade to do its magic; I figure the thawing and marinading can be done together. Why not?

I had half a tomato in my fridge, so I sliced it and put it, along with some cheese, on top of the chicken. I baked the chicken alone for about 20 minutes and then added the tomato and some cheese for a few minutes at the end. I wanted the tomato to keep its shape and not get too cooked. I used sharp cheddar, only because that was what I had in my fridge. Even though usually I love sharp cheese, it may have been too strong a flavor to pair with the soup. Maybe I should have used a more subtle cheese. Even slices of American could have worked. I love the creamy taste of melted American cheese.

I served the chicken with corn and some low calorie chicken fried rice, provided by my friend Stephanie. I have the recipe and I hope to someday share it on here once I make it!

As I have mentioned before, Sophia is a horrible eater. She takes forever!! I swear she eats like a slow poke in hopes that I give up waiting and tell her she is permitted to stop eating. That is not me. She has to eat her meals. The rule has always been if she didn't eat enough of her dinner, then she would not be allowed to have snacks for the rest of the night (or until the next meal if we are having breakfast or lunch). This rule sometimes works, except I still have to wait forever for her to finish. Her meal is always served before mine; then I eat, finish, and do the dishes. Sometimes I still have to wait 45 minutes for her to finish eating AFTER I finish the dishes. Let me tell you, I am not a fan of doing dishes, so there is no way I want to go back to doing them just because she wants to take forever! Tonight I made up a new rule. She has until I am done doing the dishes to finish eating. When I am done, her plate gets taken away. If she had not finished yet, it still gets taken, and no snacks are allowed either. I hope this cuts down on the playing around and getting up from the table. It may sound strict, but it is very important to me that my child eats good food that is real BEFORE any snacks are allowed.

Tuesday, October 25, 2011

Winner Winner Chicken Dinner

Tonight I did not plan a big meal. I pulled chicken out of the freezer, but was not quite sure what I wanted to do with it. I am beginning to feel a tad bit of pressure to make outrageously impressive meals, because now my dinner audience is not only a 4 year old and the occasional guest. It is you! And I strive to impress you! Well, kinda. I strive to do my best and make this blog an enjoyable experience all around, but like I said before: I am no chef! New recipes aren't going to happen everyday, though I strive for them at least twice a week. Monday is almost definitely always going to be a new recipe day. At least until I get to the point of having to redo some favorites. This is about the everyday mom who doesn't like to cook plain and bland.
So tonight's dinner consisted of 3 basics. Chicken, potatoes, and corn. I marinated the chicken in the Hawaiian flavor of Lawry's 30 minute marinade. I highly recommend Lawry's marinades. They are very inexpensive and lots of times you can find a coupon. I have used the Hawaiian, Steak and Chop, and a Lemon Garlic flavor. 30 minutes is the minimum for the marinade, but you can have it in longer. I put mine in for about 2 hours. If you store your frozen chicken in a Ziploc bag, pull it out of the freezer the night before you cook it and add the marinade then. It will infuse the chicken as it thaws and you will be able to cook with it right away after work without waiting the 30 minutes to marinade.
I tried to jazz up my mashed potatoes a bit. I boiled and mashed 4 medium sized potatoes. As they were getting mashed, I added a tbsp margarine, some milk, rosemary, and garlic powder. Usually I just use milk and butter or margarine, but I was in the mood for something more. Sophia was not too thrilled over the strings (rosemary) in her mashed potatoes. Next time I want to jazz up the flavor of my mashed potatoes, I will go with flavors that are less visible. She loves to use the mixer to make mashed potatoes, so I am no longer allowed to do that by myself. Once the potatoes are done being mashed, she loves licking the mixer prong. We call it a mashed potato lollipop.
I didn't do anything to the corn. Just steamed it in a bit of water. No butter needed. Who wants those extra calories? My mother is what I call a Butterington. She likes to add a ton of butter to everything. At least that is what she did when I lived there; it drove me nuts. Any vegetable that was steamed would be covered in butter. Now that I am able to cook for my little family, I use the least amount of butter possible. I tend to use margarine if butter is needed.
Sophia's favorite vegetable combination is mashed potatoes and corn, so this dinner was bound to be a winner before it was even served.

Friday, October 21, 2011

Mustard-Pretzel Chicken


This meal was inspired when I made the pretzel breadcrumbs. I made the breadcrumbs so the pretzels wouldn't go to waste, but had not thought about what I would do with them. I decided to spice up basic breaded chicken. What pairs better with pretzels than mustard?  A new recipe was born!

  • 3 thin sliced chicken breasts
  • 2 eggs
  • 1tbsp brown mustard
  • flour
  • pretzel breadcrumbs
  • cooking spray
Preheat the oven to 350. Spray a thin layer of oil on a baking sheet. Use three bowls to set up your breading station. I did not indicate a specific amount of flour or breadcrumbs, because I just pour a nice pile of each into its own bowl. Use what you think you will need to coat the chicken, you can always add more. So one bowl for flour, one bowl for eggs, and one bowl for the pretzel breadcrumbs. Add the tbsp of brown mustard to the bowl of eggs and beat together. Coat your chicken with flour, then egg mixture, then pretzel breadcrumbs. Place on baking sheet. Lightly spray the top of the chicken to help the pretzel breadcrumbs brown while baking. Bake for approximately 20 minutes or until chicken is fully cooked. I have a habit of slicing my biggest breast to check before I decide it is finished cooking. This makes the presentation less attractive, but I would rather not give someone food poisoning just because I wanted to make sure it looks pretty.

I will definitely be making this again. I may add more mustard next time though. The flavor with the pretzel was nice, but I think it could use a little more of a kick. I could be wrong though. I am still fighting a cold, so my taste buds might not be up to par. The texture was great as well. I am not a huge fan of frying my breaded chicken in oil. It is hard to keep the breading on the meat, the breading gets soggy, and it adds unneeded fat. Baking keeps everything intact and requires much less oil. Whether you bake or fry, it is up to you. Any recipe can be tweaked to suit your own tastes!

Thursday, October 20, 2011

Chick's Got Some Big Breasts!

Thank goodness tonight was a leftover night! Today I woke up sick. I am all stuffed up and have massive pressure going on in my head. On top of that I had promised my sister I would babysit my three nephews so she could go on a date night with her husband. I had no extra energy to put towards a meal, so tonight was leftover sausage, autumn pasta carbonara, and mixed veggies in creamed corn. If you cook great early in the week, leftover night is not so bad! Tomorrow I plan to make Mustard-Pretzel Chicken using the homemade pretzel breadcrumbs that I mentioned yesterday. The only work I had tonight was to prep my chicken breasts.

I do not refer to most of my cooking and prepping as "work" often, but I really do hate getting up close and personal with raw chicken. I don't have much of a choice though, since I eat chicken more than I do any other meat. It is healthy, quick, and very versatile. I will usually look for a large family pack of skinless boneless breasts. When buying the larger packs the price per pound is usually a bit cheaper. Once I get home, I will break the pack down into small portions and freeze them. This has to be one of my least favorite kitchen activities, but it is so worth it once it is done.

I think the chicken breasts are too thick. The only time I like using breasts as thick as they come is when I plan on stuffing it. For the most part, I prefer thin slices of chicken. Thinly sliced chicken breasts are available at most supermarkets, but they are usually more expensive. I also feel they use a lower quality of meat for these thin slices. So I cut them into thin slices myself. It is nice to have my perfect portions in my own freezer ready to use once thawed. I will cut one thick breast into 2-3 slices, a quarter inch thick each. These smaller slices of breast also help myself with portion control. If food is front of me, I will eat it, whether I am still hungry or not. Having smaller slices portioned out before I even cook them makes it easier to eat less. I portion out 3 slices into a Ziploc bag. Sophia will usually only eat half a slice and I will eat one and a half. Between the two of us, we are only eating one thick breast. I can turn a pack of 8 breasts into 8 meals.

The technique I use is simple. I hold a breast down flat with my left palm while slicing horizontaly with my right hand. Imagine how a delicatessen would slice a hoagie roll.

This tip may seem obvious for some, but it wasn't to me! I only started doing this to my chicken 6 months ago. It sure did make my packs of chicken last longer!

Tuesday, October 18, 2011

Pressure Cooked Teriyaki Chicken Wings

I apologize in advance for the lack of picture with this recipe! I have a picture and they look really delicious. Except that I forgot to put the memory card back into the camera when I took the picture and I do not have a cord to connect it to my computer. So let's use our imagination, shall we?

I promise, next time I make them, I owe you a picture!
(same goes for the vegetable broth I also made today)


Anyway.....We found out recently that Sophia loves chicken wings. My child is such a finicky eater. Trying to get her to eat more than 3 bites of anything is torture. I do not know where she came from! I have always been a great eater. If I find something she loves, I try to make it often. This is the first time I have ever tried to cook wings, and they came out fabulous. Plus a pack of 6 full wings (drums and wings connected) cost me less than $2!

  • 2 pounds chicken wings
  • 6tbsp sesame oil
  • 1 cup low sodium teriyaki sauce
  • 1tbsp lemon juice
  • 2 tbsp sugar
  • 1/2 tsp crushed red pepper
  • toasted sesame seeds**, for garnish

Combine all ingredients, except 2 tbsp sesame oil and the toasted sesame seeds, in a large bowl and cover with plastic wrap. Refrigerate for at least 2 hours (overnight is recommended).
Heat 2tbsp sesame oil in pressure cooker on "high" or "brown" with lid off until sizzling. Using tongs, remover chicken wings from marinade (reserve marinade) and place in cooker to brown. Stir around to brown as many wings on as many sides as possible. Pour marinade over wings, securely lock on lid, and cook on high for 7 minutes. Let the pressure release naturally for 10 minutes, then perform a quick release to safely remove lid. Remove with tongs and top with toasted sesame seeds.
**To toast raw sesame seeds heat them in a pan on the stove over medium heat until golden brown. Shake the pan to keep them moving so they don't burn.


OK, I cheated. I used olive oil instead of sesame oil and I left out the sesame seeds. I love sesame seeds and have nothing against sesame oil. I did not have either of them on hand. The wings were delicious. Sure, they probably would have had some more flavor if I had used sesame oil. I plan to grab a bottle next time I am at the food store.
As I should have done with the Autumn Pasta Carbonara, I have omitted the crushed red pepper. My objective is a child that eats. Spicy is not the way to reach that goal!
The recipe called to have the drums and wings separated. Mine came as full wings and I decided to keep them that way. My knife collection is crap and I am never really in the mood to fight with raw chicken. I am so glad I did. These wings were so tender that once cooked, they came apart super easy. I prefer the wing portion and Sophia likes the drum. Perfect couple!

Definitely will make this again! Cheap, easy, and delicious! I paired them with wild rice and stir-fried pea pods. Soph insisted the pea pods were string beans. While eating she exclaimed "I know why they are called STRING BEADS!!! On the outside it is a STRING and the inside has the BEAD!!!"